|
The grass is always greener on the other side, and switching suspension brands is a common tactic when searching for that extra bit of performance. Currently, there isn’t one suspension manufacturer that’s clearly superior over the others, so that leaves riders trying out all the options out there to figure out what works best for them. When you’re switching out your rear shock, one often overlooked yet critical step is the mounting hardware. Without the correct mounting hardware, your fancy new shock is a meticulously engineered paper weight. Our last blog on mounting hardware outlined your options, and if you decide you want to reuse your mounting hardware from your previous shock in your new shock, this is a guide to make that swap as easy as possible. As long as you’ve got the right tools and the fine motor skills to use them, there’s no reason you can’t reuse your mounting hardware in your new shock! While there are countless combinations of mounting hardware styles and shock brands, there are two situations that are far more common than the rest. The vast majority of riders are either replacing their RockShox shock equipped with RockShox mounting hardware with a Fox shock, or they’re replacing their Fox shock equipped with Fox mounting hardware with a RockShox shock. We’ll cover exactly how to perform both of those swaps in this article, with videos accompanying both scenarios to help the visual learners out there. If you don’t fall exactly into either of those categories, it’s still very likely that one of the guides will still apply to your situation. Regardless of which brand of shock your mounting hardware currently calls home or the new digs it’s moving into, the most important variable is the style of mounting hardware. If your current shock has either Fox or RockShox mounting hardware, then this guide still applies to your situation. Figure out which one you have, and then follow the guide that covers that brand of hardware. With that housekeeping out of the way, let’s swap some hardware. |
 |
Switching shock brands from RockShox to Fox
Before we start swapping hardware, let’s make sure we have the correct tools for the job. The specialty tools required to swap RockShox hardware into a Fox shock are the Fox Hardware Removal Tool, and a DU bushing tool. Our favorite DU bushing tool is the Abbey DU Bushing Tool, but there are a few other options out there. You’ll also need some wrenches to use your DU bushing tool and a flathead screwdriver to pry out the IGUS bushings. A hammer and a vice will also make things easier, but they’re not necessarily required if you’re willing to think critically.
Unsurprisingly, your first step is removing the RockShox hardware from the RockShox shock. The Fox Hardware Removal Tool may not be a RockShox product, but it works perfectly for removing RockShox hardware. It’s made up of two halves, and you’ll place the larger of the two on a sturdy bench top with the wider side down. Place the eyelet of the shock centered over the opening, and place the smaller diameter half of the tool on top of the eyelet. Push straight down, and the hardware will get pushed straight out of the shock. Oftentimes your body weight is enough to break the hardware loose, but it could be that a hammer is necessary to jostle it out. Your Fox Hardware Removal Tool will catch all of the little hardware pieces once it’s punched through, so you probably won’t lose a piece of hardware somewhere in the garage. No promises though!
 |
 |
 |
While it may look like your eyelet is completely empty now, you’ve actually still got a DU bushing tucked in there. In the video, you’ll see that we re-use that remove the DU bushing and reuse it in the new shock, but it’s actually more correct to replace the DU bushing. DU bushings only cost a dollar, so you might as well get a new one while you’re already picking up these specialty tools. You’ll still need all the same tools, but getting a new bushing saves you the step of removing the bushing. It’s up to you! To cover all our bases, we’ll also explain removing the DU bushing from the RockShox shock.
The Abbey DU Bushing Tool is a pretty sweet piece of equipment, and does a great job of not damaging your DU bushing during removal and installation. There are other DU bushing tools out there that we’ve tried, but they all either require a vice or damage the DU bushing so much that it can’t be reused, hence our recommendation for the Abbey DU Bushing Tool. It’s quite simple to use, just stick the threaded rod through the shock eyelet and make sure the larger piece has the open end facing the shock. This cavity will catch the DU bushing as it’s pushed out. Then place the smaller diameter end in the DU bushing, and thread the tool together with two ½” wrenches or two 13mm wrenches. Ensure that you’re threading the side that is pushing the DU bushing through, rather than threading the side that will catch the DU bushing. This puts all the force directly into the bushing, rather than into the shock first and then into the bushing.
 |
 |
 |
Now you’ve got a completely bare eyelet and all of the RockShox hardware removed and ready to install. Make sure to clean it up and set it aside for now. We’ve got to prepare the Fox eyelet now.
Every aftermarket Fox shock comes with IGUS bushings pre-installed in its eyelets, and we’ll need to remove those to install the RockShox hardware. Fox mounting hardware uses IGUS bushings, which is why every Fox shock has them, but we’re not sticking to Fox’s script right now. A flathead screwdriver is the perfect tool for the job, and you’ll need to be careful during this step. The main goal is to not scratch the inside of the eyelet, even though a little scratch won’t hurt anyone. IGUS bushings are two pieces, and there’s a little seam in the middle of the shock eyelet. You’ll stick your screwdriver in this seam, and gently pry one side out. Go slowly, and you’ll keep your eyelet scratch free. But like I said, a little scratch won’t hurt your performance or keep you from installing the RockShox hardware.
Once you’ve got those IGUS bushings out, you’ve completed all the removal steps! You should have two bare eyelets in front of you, and you’ll see that they’re the exact same dimensions, even though they’re different brands of shocks. Shock eyelet dimensions have been standardized for years, and is exactly why we can mix and match hardware and shock brands.
 |
 |
 |
The first step of installation is pressing in the DU bushing. Without a nice DU Bushing Tool, Angus MacGyver himself couldn’t jam a DU bushing into an eyelet, so make sure you’ve got the correct tool for the job. Apply a bit of grease to the outside of the DU bushing and the inside of the shock eyelet, and use the DU Bushing Tool to press everything together while everything is centered. Again, make sure that you’re applying torque to the side that’s pushing the DU bushing into the shock, rather than the side that’s pressing against the shock. This makes it more likely that your shock looks brand new at the end of this, but installing DU bushings always comes with the risk of some small marks by your shock’s eyelet.
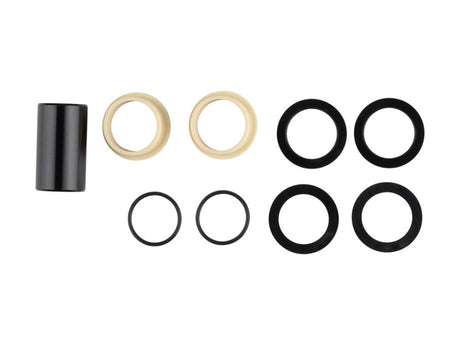
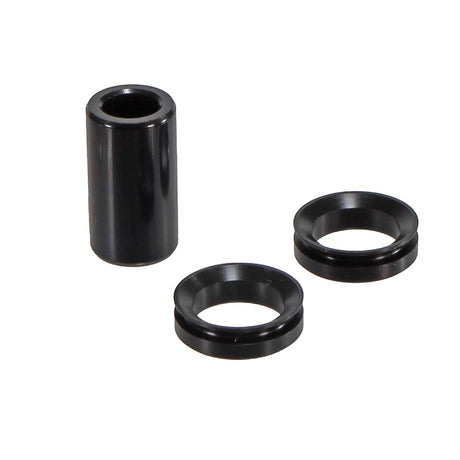
Next up is installing the mounting hardware itself. RockShox mounting hardware is made up of three pieces, and comes in a wide range of sizes. All sizes of RockShox mounting hardware use two identical pieces and one longer sleeve, and we’ll start with the long sleeve. Push that sleeve in the eyelet with the DU bushing, and do your best to get it centered. The Fox Hardware Removal Tool is actually a good resource in this situation. Set the shock on top of the lower piece of the hardware removal tool, and press the main sleeve into the eyelet. You’ll likely have to go back and forth a couple times to get it close to centered, but it doesn’t have to be perfect at this point.
 |
 |
 |
Now you’ll take the two identical spacers you’re left with, and we’ll install them on the sleeve going through the eyelet. Both of those spacers have a flange on one side, and the flanged side will face inwards towards the shock. Some smaller sizes of RockShox mounting hardware are so small that the flange falls right in the middle of those spacers, and in that case there’s no incorrect installation orientation. Those spacers generally slip on easily by hand, and actually have a habit of falling off as you go to install the shock. Now it’s likely that you’ll see one side of your hardware poking out a little more than the other, and a quick push on one side of the work bench should quickly get it centered.
You just installed RockShox mounting hardware in your Fox shock! It’s time to get that fresh shock installed and hit the trails.
Switching Shock Brands from Fox to RockShox
Before we start swapping hardware, let’s make sure we have the correct tools for the job. The specialty tools required to swap RockShox hardware into a Fox shock are the Fox Hardware Removal Tool, and a DU bushing tool. Our favorite DU bushing tool is the Abbey DU Bushing Tool, but there are a few other options out there. RockShox makes a more affordable DU Bushing Removal Tool, but it mars up the DU bushing during removal, and we’ve even seen it scratch up shock eyelets pretty bad too. So if you’re in a pinch, the RockShox DU bushing tool would work, but we strongly recommend the Abbey DU Bushing Tool to keep from scratching your shock. You’ll also need some wrenches to use your DU bushing tool and a flathead screwdriver to pry out the IGUS bushings. A hammer and a vice will also make things easier, but they’re not necessarily required.
Unsurprisingly, the first step is removing the mounting hardware from your Fox shock. The Fox Hardware Removal Tool is the perfect tool for this job, and you can either throw it in a vice or use a bench top. We’ll cover the bench top method here, but I’m sure you can figure out the vice technique if you’ve got one. The tool is made up of two halves, and you’ll place the larger of the two on a sturdy bench top with the wider side down. Place the eyelet of the shock centered over the opening, and place the smaller diameter half of the tool on top of the eyelet. Push straight down, and the hardware will get pushed straight out of the shock. Oftentimes your body weight is enough to break the hardware loose, but it could be that a hammer is necessary to jostle it out. Your Fox Hardware Removal Tool is designed to catch all of the little hardware pieces once it’s punched through, so you probably won’t lose a piece of hardware somewhere in the garage. No promises though!
 |
|
 |
Now you still have the cream color IGUS bushings in the eyelet, and you’ll need to be careful during this step. IGUS bushings are two halves pushed into the eyelet of the shock, which leaves a little seam between them in the eyelet. Take your flathead screwdriver, and nestle it in that little seam. Carefully pry one half of the IGUS bushing out, and you’ll need to move slowly and carefully to avoid scratching the inside of your eyelet. The second side of the IGUS bushing is easier to remove, but you’ll still need to be careful to not gouge your eyelet. Your Fox shock now has a completely empty eyelet, and we have all the hardware removed and ready to install in its new home!
While the RockShox eyelet may look like it’s completely empty, that’s not the case. All aftermarket RockShox shocks come with DU bushings in the eyelets because RockShox mounting hardware is based around DU bushings, but because we’re using Fox mounting hardware, we’ll need to evict those little metal bushings. Use your DU bushing tool and the wrenches needed to thread it together. Our recommendation, the Abbey DU Bushing Tool, uses ½” wrenches, while the more budget minded RockShox DU Bushing Tool uses 13mm wrenches. Because we’re just removing and not installing a DU bushing in this case, you could get away with the more affordable RockShox DU Bushing Tool, but we always recommend getting the slightly more expensive Abbey DU Bushing tool to reduce odds of damaging your fancy shocks.
Once you’ve got that DU bushing out, it’s time to install your Fox hardware in your now vacant RockShox eyelet. Make sure to give all those little pieces a nice cleaning before you install them.
The first installation step is those little IGUS bushings. While new IGUS bushings are usually a pretty tight fit, you’ve got used IGUS bushings which are typically very easy to install. If you can’t just press them in with your thumb, put them on the side of a sturdy bench top and push each side in. Make sure that they’re fully seated before you go on to the next step!
 |
 |
 |
Fox Mounting Hardware is made up of a lot of little pieces, and we’re starting with the main sleeve that goes through the IGUS bushings we just installed. Get it in place and try to push it in by hand, but it’s likely that you’ll need the extra leverage of smushing it into a work bench. Once you’ve got one side bottomed out, you’ll use the Fox Hardware Removal Tool again to push it in the rest of the way. I recommend light hammer taps to get it close to centered, but you shouldn’t worry too much about getting it perfectly centered right now. It’ll get moved around a bit more before we’re all done here.
 |
 |
 |
The first piece of the Fox hardware puzzle is the tiny little o-rings. You’ll slide one on each side of the IGUS bushings, and they’ll tuck neatly a groove in the IGUS bushing. Now, depending on the size of your hardware, you’ve either got two or four pieces left. Narrower widths of Fox Mounting Hardware have two fewer pieces than the wider widths, so don’t be alarmed if you’ve only got two pieces left. For those of you with four pieces remaining, you’ll see that two pieces have dimples on one edge, while the other two pieces do not have any dimples. Take the dimpleless pieces and slide one on each end of the sleeve, all the way up against the IGUS bushing. These are a pretty tight fit, and you’ll probably end up scooching the main sleeve around a bit while trying to get it all together.
Now everyone’s just got the two dimpled pieces left, and if you’ve got everything centered and pushed in as tight as possible to the IGUS bushings, installing them is very easy. Make sure the dimples are facing out, and slip one on each side of the mounting hardware. Congratulations, you just installed Fox Mounting Hardware on your RockShox shock!
 |
 |
 |
Conclusion
Those are the two most common scenarios when it comes to swapping mounting hardware across different shock brands, but if you’ve got a slightly different scenario, there’s a strong chance that the information here is going to be very helpful for your situation! The two mounting hardware specific tools we mentioned here, the Fox Hardware Removal Tool and the Abbey DU Bushing Tool are the perfect tools for any mounting hardware related problem, and I would strongly recommend having both of these items in your toolbox for the long term. Especially if you’ve got a hankering for suspension tinkering and tuning, these tools will pay for themselves as your friends borrow them or you get the next fancy shock a few years from now.